Welcome to September’s edition of Teach Me Tuesday. I shared this tutorial over at Lucky Star Lane earlier in the year during a guest post but realized I never shared it here and with school starting this week, I just don’t have time to create a new tutorial so hopefully you guys will enjoy this one. I’m sure it can be improved some so if anyone happens to take a stab at this and makes revisions, let me know. I’d love to see it. 🙂
At my house we have this shelf above the sink that seems to be the dumping ground for anything kicking around the kitchen that does not have a permanent home. Since our kitchen is the main hub I often find myself taking my receipts from the grocery store (and Hobby Lobby!) and tossing them up on that shelf. As you can imagine it gets very cluttered especially since I’m somewhat of a shopaholic! I came across this little project the other day and thought it would be the perfect thing to store my receipts in. I made a few little changes to make it my own but it was really simple.
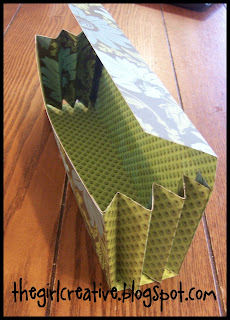
 If you can’t tell what it is, it’s an acordian envelope that hangs on the side of your fridge. The perfect little out-of-the-way place for your receipts.
The Supplies:
12×12 Scrapbook Paper (I used Amy Butler double sided paper which worked great)
Paper Cutter with Scoring Blade
Double Sided Tape
Velcro
Magnet
The first thing I did was cut my paper down to 12×9. You will need the extra 3″ inches so hold onto it. Next I took my 3×12 piece of paper and cut it in half. This will become your “acordian”.
 Then I took my 2 halves of paper and folded them like a fan.
 Next take your 9×12 sheet of paper and score it at 3″, 5″ and 8″ and fold.
 I then took my accordians and attached them to the envelope using double-sided tape.


I noticed that my cover flap (not really sure what to call it!) was a bit longer than I wanted it to be so I trimmed some of it off. I wound up using it on the front of the envelope (the opposite side of the paper so that there was a contrast) to break up the pattern a bit. I know, I’m rambling, but I did warn you! 😉
Next I added velcro inside the envelope so that it would stay closed.
 Then lastly I put a magnet strip on the back and hung it up on the side of my fridge.
XOXO
Diana
www.thegirlcreative.com


No way! This is super cute! But, I think I’d have to line my whole kitchen with them to fit in all the crap I throw on my kitchen island. The clutter just never ends – perhaps I should stop shopping.
Seriously so clever! I have a mini accordion file for all my coupons, but this would be great for my receipts! Thank you soooo much for sharing!! 🙂
That is so creative and cute! I’m going to use this idea for my staff at work! It will help them keep their stuff in it! 🙂
Will have to try this sometime. Perfect for holding my mail
Super cute!!! Very cute idea!
I really like this!! Maybe I’d be better about filing my receipts if it was cute and more convenient like the fridge!
This is such a cute project!
what a cute project!
i’ll definitely try this… i have lots of small but important papers that needs filing. and this would be a great help!
thanks for sharing!
this is such a cute idea, i love it!! this might be good for all of those random recipes that i print off and don’t really have a home for except in the front of my other cookbooks! 🙂 might have to give this a try!
Great step by step instructions. A great “rainy day” project for my middle schooler and her friends to help keep the organized.
OMG!! This is *exactly* what I need!! Pretty and functional. We have a bar in the kitchen that regularly gets filled with papers and receipts. I am thinking maybe more than one envelope and labeling them, like “work receipts” (until they get filed of course), take out menus, bills to pay. hmmm, I see a weekend project coming up. And I have been looking for ideas to use up some of my papers.
The best part of this design is the magnet strip on the back to put it on the fridge! SMART! Much nicer than my big ol’ rubbermaid box on the kitchen counter!
http://www.tuscanydesign.net/craftbook
Love it! And looks so easy, I think I could do that!
growinglittlehearts.blogspot.com
I love it. I will be making one for my business receipts. Sounds super easy!
New follower from the blog hop.
http://www.thehickmanfour.blogspot.com
http://www.touchofhomelearning.com